The proficiency of a chef is intricately tied to the sharpness of their knives, making the art of knife sharpening an indispensable skill. “How to Sharpen Kitchen Knives” serves as a pivotal guide for both seasoned chefs and home cooks alike, offering invaluable insights into the techniques and tools necessary to maintain razor-sharp blades. As a culinary cornerstone, a well-honed knife not only enhances the efficiency of food preparation but also elevates the overall cooking experience. This comprehensive tutorial ensures that enthusiasts at any skill level can navigate the nuanced process of knife sharpening with clarity and precision, ultimately fostering a safer and more enjoyable culinary journey. Join us on a journey to discover the art and science behind achieving the perfect edge for your kitchen knives.
1. Choose The Right Angle
To master the art of knife sharpening, it’s crucial to follow a meticulous process that incorporates various elements. The first step in honing your blades is to choose the right angle. Determining the optimal angle for sharpening depends on the type of knife and its intended use. Generally, a 20-degree angle is suitable for most Sharpen kitchen knives, but some may require a more acute or obtuse angle. Precision in angle selection ensures that the blade is honed evenly, enhancing its cutting efficiency.
2. Soak Or Lubricate The Whetstone
Once the angle is set, the next key aspect is to soak or lubricate the whetstone. Submerging the whetstone in water for a sufficient period softens the abrasive surface, allowing for a smoother sharpening process. Alternatively, some may choose to use honing oil to reduce friction and prevent the blade from overheating. This step not only facilitates a more controlled sharpening experience but also prolongs the life of the whetstone, ensuring consistent results over time.
3. Secure The Whetstone
Equally important in the sharpening process is the need to secure the whetstone. A stable and immovable surface ensures that the blade is sharpened with precision and reduces the risk of accidents. Using a non-slip base or securing the whetstone to a countertop adds an extra layer of safety, allowing the sharpener to focus solely on achieving the desired edge without worrying about the stone shifting during the process. In essence, the combination of selecting the right angle, preparing the whetstone appropriately, and ensuring its stability forms a comprehensive approach to sharpening kitchen knives effectively and safely.
4. Hold The Knife Properly
Perfecting the technique of knife sharpening involves not only choosing the right tools and angles but also ensuring proper handling of the knife itself. Holding the knife properly is a fundamental aspect of the sharpening process. A secure grip, with fingers away from the blade’s edge, provides stability and control, minimizing the risk of accidents. This foundational step sets the stage for a safe and effective sharpening experience.
5. Start With The Coarse Grit
As you embark on sharpening your kitchen knife, it’s crucial to start with the coarse grit. This initial phase removes any nicks, burrs, or dullness from the blade, setting the foundation for a finely honed edge. The coarse grit acts as the workhorse in the sharpening process, reshaping the blade and preparing it for the subsequent finer grits. Patience and consistency in this phase contribute significantly to the overall sharpness and longevity of the knife.
6. Alternate Sides
To achieve a uniformly sharp edge, it’s essential to alternate sides during the sharpening process. Moving the blade back and forth ensures that both sides receive equal attention, preventing asymmetry in the sharpness of the edge. This balanced approach enhances the overall cutting performance of the knife, allowing for precise and effortless slicing, dicing, and chopping. By holding the knife properly, starting with the coarse grit, and alternating sides diligently, you’ll master the art of knife sharpening, transforming your kitchen tools into precision instruments for culinary excellence.
7. Switch To Fine Grit
Once the initial sharpening with the coarse grit is complete, the next crucial step is to switch to the fine grit. Transitioning to a finer abrasive surface refines the edge, providing a polished finish to the blade. This finer grit enhances the sharpness achieved in the earlier stages and contributes to a smoother cutting experience. It is essential to be patient and deliberate during this phase, as the fine grit plays a pivotal role in elevating the knife’s sharpness to its optimal level.
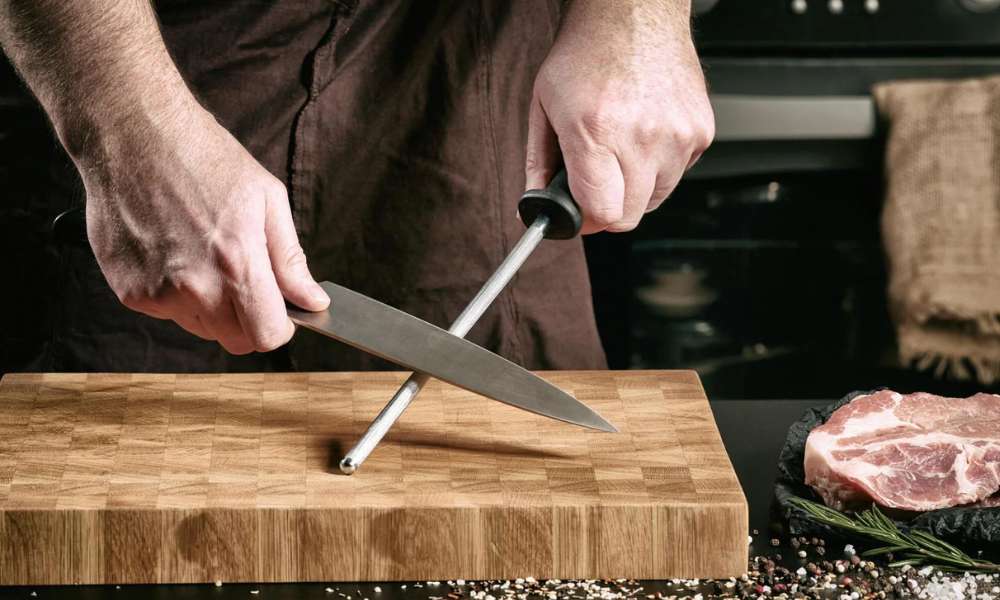
8. Hone The Edge
Following the switch to the fine grit, the subsequent step is to hone the edge. Honing helps align any microscopic imperfections in the blade, ensuring a razor-sharp edge. This step is particularly important for maintaining the knife’s sharpness over time and between more extensive sharpening sessions. Using a honing rod or honing steel, gently swipe the blade against the rod at the same angle used during sharpening. This quick but critical step helps maintain the knife’s edge, promoting longevity and sustained cutting performance.
9. Check Sharpness
To conclude the sharpening process, it is imperative to check the sharpness of the knife. Carefully run your fingertip along the edge to feel for any irregularities or burrs. Additionally, perform a paper or food-cutting test to assess the knife’s effectiveness. If the blade effortlessly slices through paper or food items, it indicates a well-sharpened knife. Regularly checking sharpness and honing as needed will ensure that your kitchen knives remain in peak condition, ready to tackle any culinary challenge with precision and ease.
10. Clean The Knife
After completing the sharpening process, it is essential to thoroughly clean the knife. Carefully remove any metal shavings or debris that may have accumulated during the sharpening, ensuring a pristine and safe kitchen tool. A quick rinse under running water, followed by a gentle wipe with a clean, dry cloth, will suffice. Proper cleaning not only maintains the hygiene of the knife but also prevents any residue from affecting the quality of your culinary creations.
Read More: Kitchen Window Sill Decorating Ideas
Conclusion
Mastering the skill of knife sharpening involves a systematic approach and attention to detail. Starting with selecting the right angle, soaking or lubricating the whetstone, securing it properly, and holding the knife correctly, each step plays a crucial role in achieving a sharp and efficient blade. Moving from coarse to fine grit, honing the edge, and regularly checking sharpness contribute to a well-maintained and reliable kitchen tool. With patience and practice, this comprehensive guide empowers both professional chefs and home cooks to elevate their culinary experience by ensuring that their knives are consistently sharp and ready for any culinary task. Incorporating these techniques into your routine will not only enhance the longevity of your knives but also add a touch of precision to your every slice, dice, and chop.